This walks through the two things people usually ask about after installing Ariadne: turning on AI-powered matching with a Voyage AI key, and customizing how the related-posts block actually looks. Both live in different places than you might expect, so here’s exactly where to click.
What’s free and what needs Pro first
Before touching any settings, it helps to know which part of this guide applies to your plan. AI-powered matching (the Voyage AI part) and full style control in the Customizer are both Pro and Pro+ features. If you’re on Free, you can still follow the setup steps below, the fields are visible either way, but the AI signal itself won’t activate, and the Customizer’s Related Posts section won’t be reachable at all.
One setting is the exception, and it’s worth knowing up front: how many related posts show by default. That one is free on every plan, just not from the Customizer. More on that at the end.
Getting a Voyage AI API key
Ariadne’s free tier already matches posts by tags, categories, title overlap, and local text similarity, entirely on your own server, with nothing sent anywhere. Voyage AI adds a second layer on top: a semantic-embedding signal that understands what a post actually means, not just which words it uses, so two posts using completely different vocabulary can still score as closely related.
To use it, you need your own Voyage AI account and API key. Ariadne doesn’t provide one, and it never sends anything unless you’ve entered a key yourself.
- Go to voyageai.com and create an account.
- In the dashboard’s API keys section, click to create a new secret key.
- Copy it somewhere safe. Voyage only shows the full key once, and if you lose it, you’ll need to generate a new one.
Keep this key private. Anyone with it can make API calls billed to your Voyage account.
Entering the key in Ariadne
In your WordPress admin, go to Settings → Ariadne Related Posts, then the “AI & API” tab. You’ll see two fields:
- Voyage AI model — a text field, already filled in with a sensible default. Leave it as is unless you have a specific reason to change it.
- Voyage AI API key — paste your key here. The field is password-masked, and saving with it blank keeps whatever key is already stored, so you don’t have to re-enter it every time you save an unrelated setting.
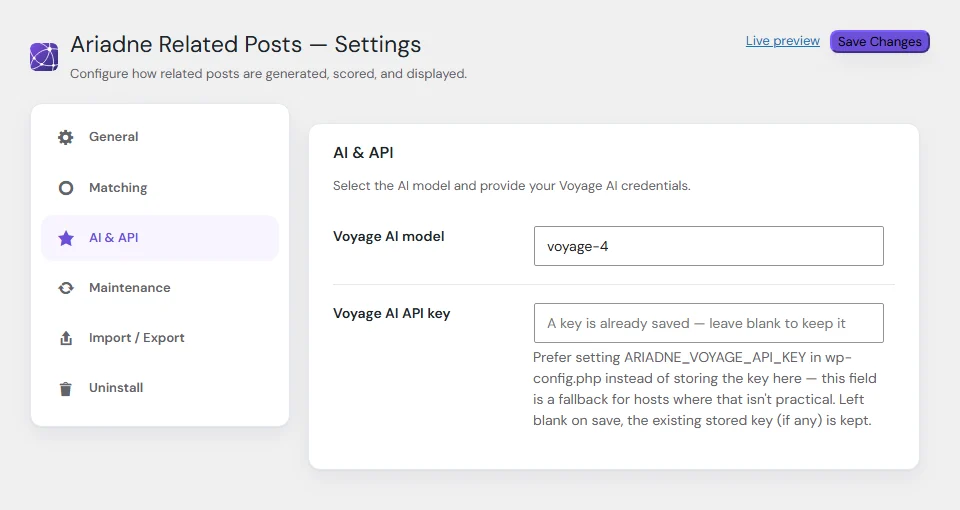
If you’re comfortable editing wp-config.php, there’s a more secure option: define ARIADNE_VOYAGE_API_KEY as a constant there instead. A key set this way always takes priority over the field, and it never touches the database, which matters if you ever export your settings or hand off site access to someone else. The Settings field is really a fallback for hosts where editing wp-config.php isn’t practical.
If you’re on Free, both fields are still visible and save normally. Nothing breaks by entering a key early, but the matching signal itself stays off until Pro or Pro+ is active. A notice on that same tab makes this explicit, with everything else (tag, title, and local text matching) working regardless.
Confirming it’s actually working
Nothing about AI matching happens while a visitor is on your site, so there’s no front-end sign to check. Two places actually show it:
The Post Status screen has a combined status column, and one of its values is literally “Not using AI.” Right after saving a key, most of your existing posts will still show that, since embeddings generate in the background over time, not all at once. Watch that count drop as background jobs work through your archive.
The Dashboard tracks AI-matching API calls over time on its usage chart, so you can see real activity rather than guessing whether anything is actually happening.
A single post’s own edit screen also has a meta box showing its current computed related list with scores, useful for spot-checking one post instead of watching the whole site catch up.
Customizing how the block looks
This part lives somewhere different from the AI settings: Appearance → Customize → Related Posts, not the plugin’s own Settings page. Every plan gets a clean default design out of the box. Full style control, the ability to change any of it, is Pro and Pro+.
Once you’re in the Customizer, controls are grouped into six clusters:
| Cluster | What it controls |
|---|---|
| Layout arrangement | Row (horizontal scroll), Grid, List, or Masonry, plus row-style treatments like boxed cards or a numbered list, grid columns for desktop and mobile separately, border style, drop shadow, background color. |
| Elements to show or hide | Date, author, category, and tag meta, the excerpt, a category eyebrow label, a numbered ranking badge, and an optional call-to-action button. |
| Text | Heading style, font choices from a curated set of Google Fonts, title and meta text styling, hover effects, excerpt length. |
| Image | Position (top, left, below the text, or behind the text, where the picture fills the card and the title sits on a dark fade), shape, corner roundness, edge-to-edge bleed, size. |
| Icon | An optional icon next to the block’s heading, a smart-default or custom color, and whether it repeats as a small badge on each card. |
| Divider | Show or hide divider lines between cards, and their accent color. |
If you’re also using inline related posts, it has its own completely independent set of these same six clusters. To make them match, set the same options in both.
Since 1.9.58 there’s also a card style picker at the top of the Related Posts section. It applies one of six ready-made looks (classic cards, text on image, wide banners, a scrolling row, a compact list, or a numbered list) in one click, and every setting stays editable afterwards.
For anything the controls don’t cover, WordPress’s own Additional CSS panel in the Customizer applies after every other setting, so it reliably overrides the plugin’s own styles without needing !important. And if you’d rather start from a blank slate entirely, a “Disable default styles” checkbox turns off the plugin’s stylesheet completely, useful if you’re styling the block from your theme or Additional CSS instead.
The one setting free users can actually change
Here’s the nuance worth knowing. How many related posts the block shows by default is controlled by the same underlying setting in two different places, and only one of them is free.
In the Customizer’s Related Posts section, under Layout arrangement, there’s a “Posts to show” control. That’s part of the same Pro/Pro+ gated section as everything else above, so if you’re on Free, you won’t see it there at all.
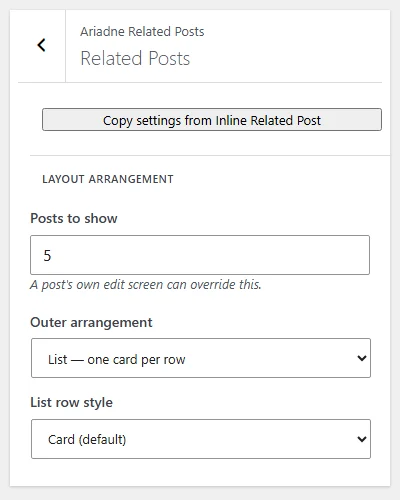
But the identical setting also lives on the plugin’s own Settings page: Settings → Ariadne Related Posts → General tab, also labeled “Posts to show.” That copy is free on every plan, no upgrade required. Set it anywhere from 1 to 10, and it becomes your sitewide default. A single post’s own edit screen can still override that number individually, which is also free, for the rare case where one page needs a different count than the rest of your site.
So if you’re on Free and want more or fewer related posts showing, the Customizer isn’t a dead end, it’s just not where this particular control lives for your plan. Settings → Ariadne Related Posts → General is where to look.
Putting it together
For a Pro or Pro+ site: get a Voyage AI key, paste it into the AI & API tab (or define it in wp-config.php), give background jobs some time to generate embeddings, then head to the Customizer to make the block match your site’s design. For a Free site: skip the AI section entirely, since the key won’t do anything without a license, and use Settings → General to set how many related posts show, which is the one piece of this whole picture that was never behind a paywall to begin with.
Related Posts
- Why Tags Matter More Than Categories for Related Posts
- Pinning, Excluding, and Cornerstone Posts: Manual Control Over Related Posts
- Related Posts and WooCommerce: Showing Products Related to Blog Content
- How to Add Related Posts to WordPress Without a Plugin
- Related Posts in WordPress: The Complete Guide